If you’re a beginner blogger and you’re using Pinterest to bring visitors to your blog, claiming your website on Pinterest is one of the first things you should do.
And don’t worry — if you’ve never done it before, it may sound a little technical, but it’s actually pretty simple.
In this guide, I’ll show you how to claim your website on Pinterest in 2026, what you need before starting, which verification method to choose, and what to do if Pinterest doesn’t verify your website.
So, let’s get started.
How to Claim Your Website on Pinterest
What Does Claiming Your Website on Pinterest Mean?
When you claim your website, you’re basically telling Pinterest:
This website belongs to me.
Pinterest then connects your website with your Pinterest account. When someone saves an image from your claimed website, your Pinterest profile can be shown with that Pin, and people can follow your Pinterest account. Pinterest also gives you more insight into how often content from your website is shared.
This is especially useful if you’re a:
- Blogger
- Affiliate marketer
- Fashion blogger
- Home decor blogger
- Food blogger
- Content creator
You can read Pinterest’s official information here
What Do You Need to Claim Your Website?
Before you start, make sure you have:
1. Your own website
You need to own the domain, subdomain, or subpath you’re trying to claim.
For example:
You generally can’t claim websites hosted by other platforms that you don’t control, such as Amazon, Etsy or eBay.
2. Access to your website
You need to be able to make a small change to your website or its DNS settings.
Don’t worry if you don’t understand DNS yet. I’ll explain the easier options below.
3. A Pinterest account
A business account isn’t strictly required, but Pinterest recommends one if you want to get the most out of your claimed website.
How to Claim Your Website on Pinterest
Now let’s get to the actual steps.
Step 1: Log in to Pinterest
Go to:
Log in to the Pinterest account you want to connect with your blog.
I’d recommend double-checking the account before you start. If you have multiple Pinterest accounts, it’s surprisingly easy to be logged into the wrong one. 😅
Step 2: Open Pinterest Settings
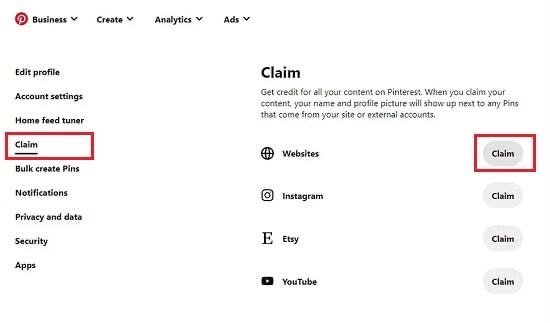
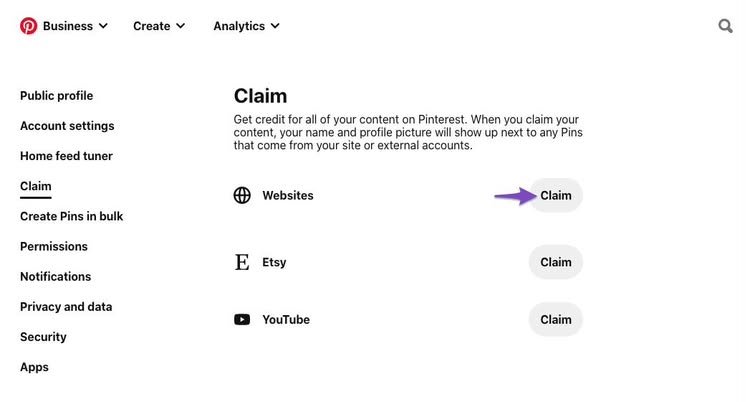
After logging in, open your Pinterest menu and go to:
Settings → Link to Pinterest → Claim next to Websites
Pinterest’s interface can change slightly over time, so don’t worry if your screen looks a little different from the screenshots you see in older tutorials.
Step 3: Enter Your Website
Click Claim next to Websites.
Pinterest will then ask you for your website and show you the available verification methods.
Enter your website address, for example:
Make sure you enter your actual website and not your Pinterest profile URL.
Step 4: Choose How You Want to Verify Your Website
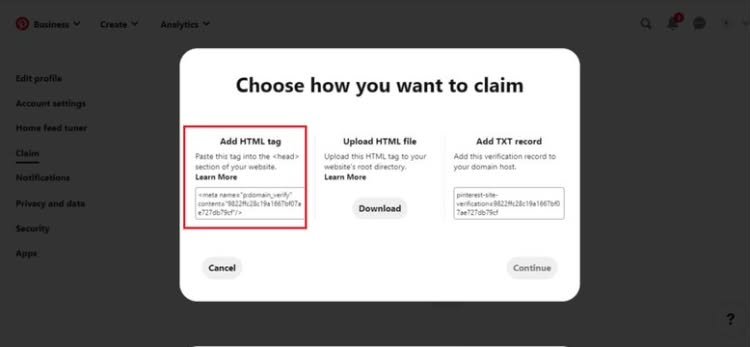
Pinterest currently provides several ways to claim a website:
- HTML tag
- HTML file
- DNS TXT record
- Google Merchant Center for some eligible accounts
The easiest option depends on your website platform and what access you have. Pinterest Help
For most beginners, I would first look at the HTML tag method.
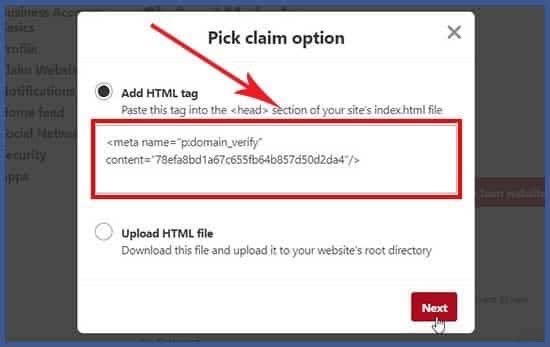
Method 1: Using an HTML Tag
This is a popular option because Pinterest gives you a small piece of code that you add to your website.
After selecting the HTML tag option, Pinterest will give you a personalised verification tag.
Copy it.
It will look something like this:
<meta name="p:domain_verify" content="YOUR-UNIQUE-CODE">Don’t copy the example above. Your Pinterest account will have its own unique code.
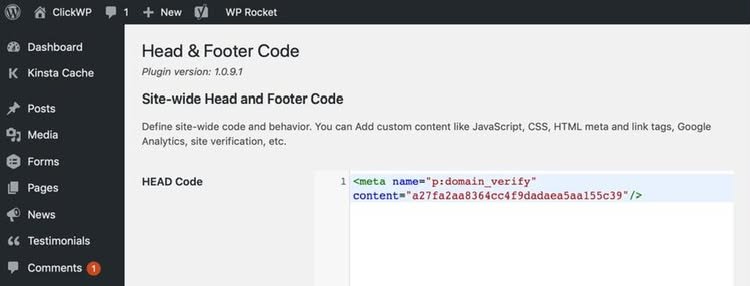
Add the tag to your website
Open your website’s HTML/source code and place the Pinterest tag inside the section.
Then go back to Pinterest, enter your website URL and click Verify.
Pinterest will automatically check your website for the tag. Once your website is successfully claimed, Pinterest says you can remove the HTML tag. (Pinterest Help)
Method 2: Upload an HTML File
Don’t want to add a code tag?
Pinterest also lets you verify your website by uploading an HTML file.
Here’s the basic process:
- Choose HTML file in Pinterest.
- Download the verification file.
- Log in to your website hosting.
- Upload the file to your website’s root folder.
- Return to Pinterest.
- Enter your website URL.
- Click Verify.
One important thing: Pinterest says the file must be uploaded to the root folder. If you put it inside a subfolder, Pinterest won’t be able to find it.
This method is useful if you have access to your website’s files but don’t want to edit your HTML code.
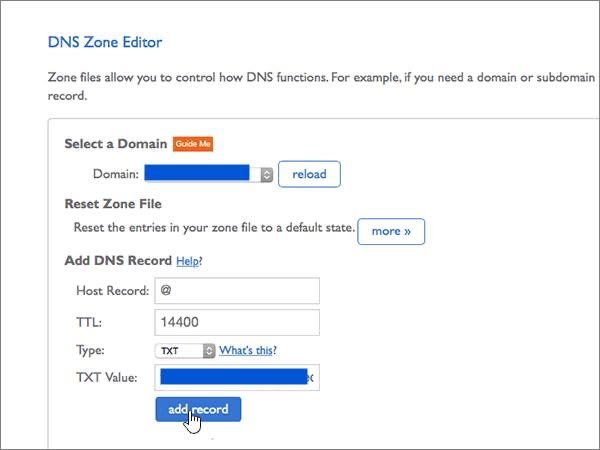
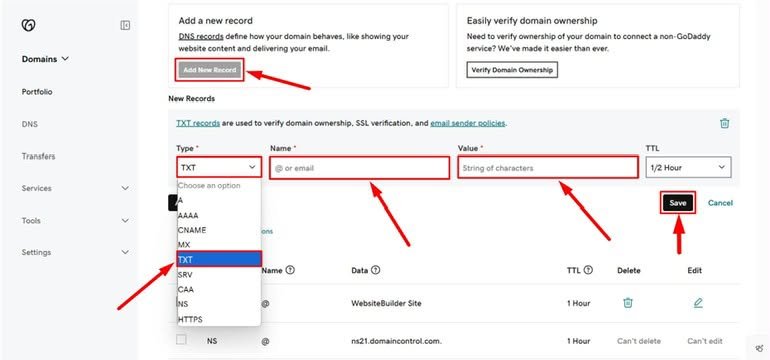
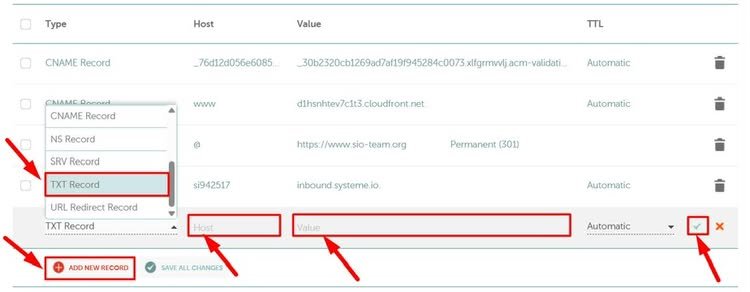
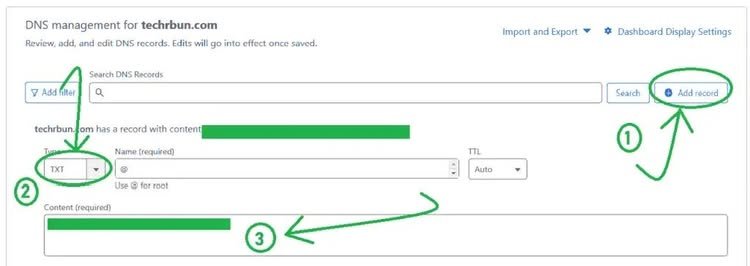
Method 3: Verify Your Website With DNS
The DNS method can look scary at first.
But the basic idea is simple.
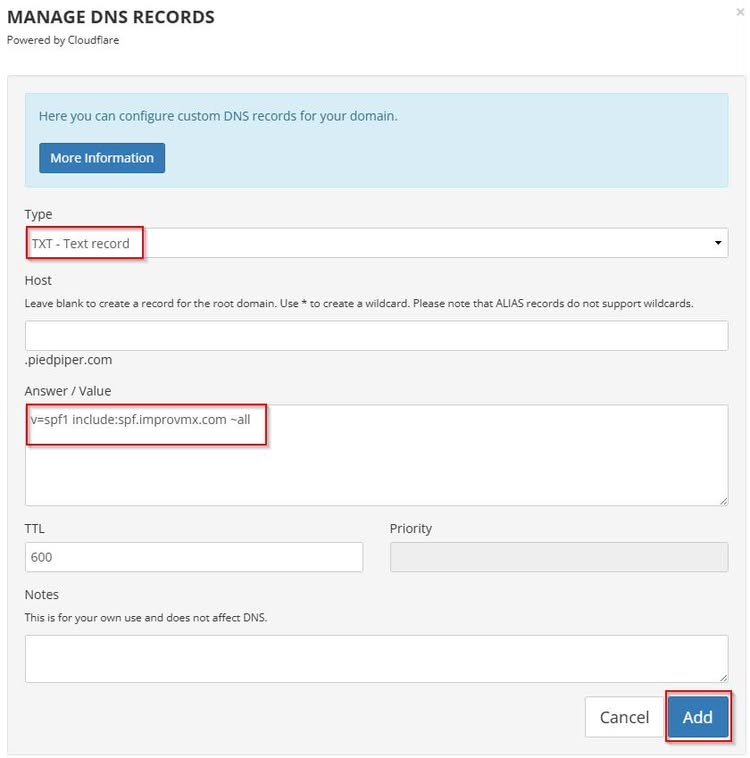
Pinterest gives you a TXT record, and you add that record to your domain’s DNS settings.
The process looks like this:
Pinterest → Copy TXT record → Open your domain host → Add TXT record → Verify
If your domain host requires it, Pinterest says you may need to use @ in the Host field.
Also, DNS changes don’t always happen instantly. Pinterest says you may need to wait up to 72 hours for the changes to take effect.
So if it doesn’t work immediately, don’t panic and start changing everything. Give it some time first.
Which Verification Method Should You Choose?
If you’re wondering which one is easiest, here’s a quick comparison:
| Method | Best for |
| HTML Tag | Beginners who can edit website code |
| HTML File | People with access to website files |
| DNS TXT | People comfortable with domain settings |
| Google Merchant Center | Eligible accounts already using it |
If you’re completely new to this, I’d try the HTML tag method first if your website platform makes it easy to add the tag.
What If Pinterest Can’t Verify Your Website?
This is probably the most annoying part. 😂
You follow everything, click Verify, and Pinterest says it couldn’t verify your website.
Before you worry, check these things.
Check your website URL
Make sure you entered the correct domain.
For example:
Don’t accidentally enter an old domain or a different website.
Check your HTML tag
If you’re using the HTML method, make sure the Pinterest tag is inside the section.
Check your HTML file
If you’re using the HTML file method, make sure the file is in the root folder, not inside another folder.
Check your DNS record
If you’re using DNS verification, make sure the TXT record was copied correctly.
And remember — DNS changes can take time. Pinterest says they may take up to 72 hours. (Pinterest Help)
How Do You Know If Your Website Is Claimed?
Once Pinterest successfully verifies your website, you can check your claimed websites from your Pinterest settings.
Go to:
Settings → Claimed accounts
Your successfully claimed website should appear there.
And that’s your confirmation that everything worked.
🎉 Your website is officially claimed!
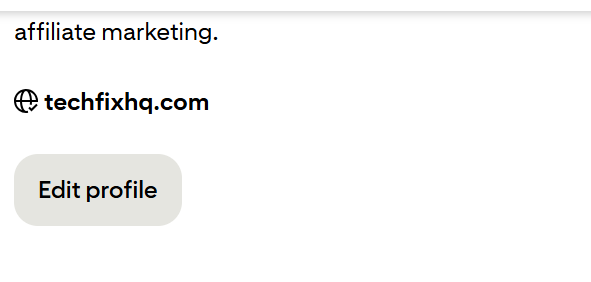
You’ll also see a checkmark on the globe icon as well, just like in the screenshot below.
What Should You Do After Claiming Your Website?
Now comes the fun part.
Don’t think that claiming your website will suddenly make your Pinterest traffic explode. It won’t.
It’s simply an important part of setting up your Pinterest account correctly.
After claiming your website, start creating useful Pins for your blog posts.
For example, if your blog has an article called:
25 Best Artificial Indoor Plants for Home Decor
Create a nice vertical Pin for that article and link the Pin directly to the blog post.
This gives Pinterest users an easy way to discover your content and visit your website.
I’d also recommend adding your website link to your Pinterest profile if you haven’t already.
Once your website is claimed, you can start focusing on improving your Pinterest visibility. If your impressions suddenly drop, here’s how to fix a Pinterest impressions drop.
Final Thoughts
If you’re a beginner blogger, claiming your website on Pinterest is definitely worth doing.
It doesn’t take long, and once it’s done, you can focus on the things that actually bring traffic — creating helpful content, making attractive Pins, using relevant keywords and staying consistent.
And don’t overthink the technical part.
If one verification method feels confusing, try another one. Pinterest gives you multiple options, so you don’t have to be a web developer to get your website claimed.
Once you’ve done it, you’re ready to start using Pinterest properly to bring more people to your blog.
So, why wait? Go ahead and claim your website today, create your first few Pins, and start sending Pinterest users to your blog. And if you found this guide helpful, feel free to share it with another beginner blogger who might need it too.